
The last camping trip shouldn’t end with a cracked fitting next spring. Winterizing is about reaching the water you can see—and the little pockets you can’t.
Plan the job before your stored camper is exposed to freezing temperatures. This is a guide for putting an RV into storage, not for keeping an occupied camper’s plumbing running through winter. Jayco’s timing guidance ↗
First: which water heater do you have?
Conventional tank: the sequence below uses a drained tank and its bypass.
Tankless, Truma or hydronic system: follow the exact model’s winterizing instructions before proceeding. Some require different draining or antifreeze treatment. Truma AquaGo, for example, has its own Easy Drain procedure; the tank diagram below does not apply.
If you cannot identify your valves or heater, stop and get model-specific help.
Truma AquaGo: winterizing and depressurizing FAQsThe bottle matters more than the colour.
Use only antifreeze labelled for RV/marine potable-water systems and approved for your equipment. Never use automotive coolant or windshield-washer fluid. Choose protection suitable for your storage conditions. Ready-to-use products must not be diluted unless the label instructs it; a burst-protection rating is not the temperature at which the liquid first becomes slushy.
Camco: antifreeze dilution & burst protection (PDF)Know your system. Gather your supplies.
Find the winterizing section in your camper’s manual, then identify the water heater, pump inlet, low-point drains and every water-using appliance. This guide follows the RV-antifreeze method for a conventional storage-tank water heater; your manuals decide the exact fittings and valve positions.
Have potable-water-system RV/marine antifreeze, a compatible winterizing connection, the correct drain-plug tool, a catch pan, gloves and a flashlight ready. Buy the amount your manual calls for, plus enough for traps and extra outlets. There is no one-size-fits-all number of jugs.
Make it easierTake a clear photo of the plumbing and valve labels before changing anything. Save the heater’s model number alongside it.
Switch off, cool down, release pressure.
Turn off every water-heater heat source, including propane operation and the electric element if fitted. Let the water cool completely. Disconnect city water, turn the pump off and open a hot faucet to relieve water pressure; complete any additional pressure-relief steps in the heater manual.
Only then remove a drain plug or anode rod, using the heater manufacturer’s procedure. Never loosen one while the heater is hot or pressurized. Keep the heater off throughout winterization.
Make it easierPut a visible ‘EMPTY — DO NOT TURN ON’ tag beside the heater controls. Remove it only after the system is restored and the tank is full in spring.
Give the water somewhere to go.
At an appropriate dump station, empty and clean the black tank, then the grey tank. Drain the fresh-water tank and the hot and cold low points according to your RV manual. Open the appropriate fixtures to admit air, and collect or dispose of liquids as directed.
Let the conventional water-heater tank drain fully. Follow its instructions for inspecting the plug or anode and its storage position. Close the low-point drains before drawing antifreeze, except when your manual specifically directs you to protect an individual drain branch.
Make it easierDo not leave ordinary water in a system that will freeze. Follow the manufacturer’s winter-storage instructions for waste tanks, valves and seals.
Route around a conventional heater tank.
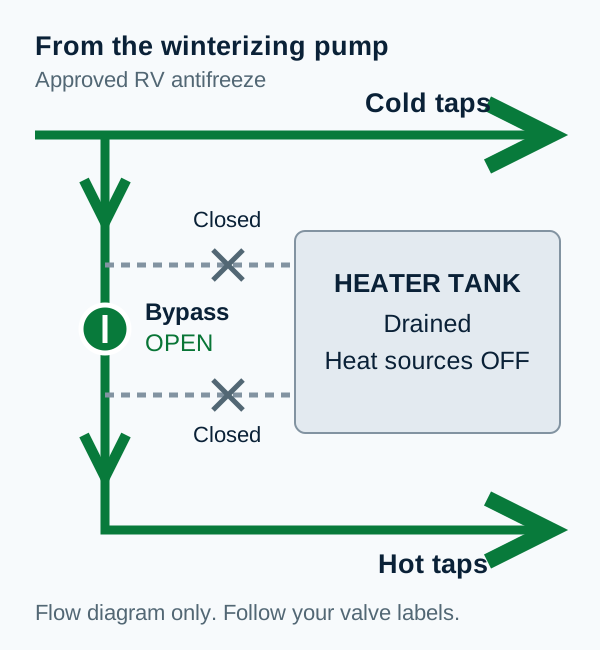
Set the drained tank’s bypass using the valve labels and your RV manual. This keeps antifreeze out of the tank while allowing it to reach the hot-water plumbing. One-, two- and three-valve arrangements differ; the sketch below explains the flow, not which way your handles should point.
Remove or bypass water-filter cartridges as their instructions require, and drain or protect the housings. Set the winterizing inlet so the pump draws from the antifreeze jug through the approved connection. Do not pour antifreeze into the fresh-water tank unless your manufacturer specifically requires that method.
Make it easierIf a jug empties unusually quickly, stop and check the bypass, open drains and leaks before adding more.
Protect the lines. Leave the tank drained.
Work through every hot and cold outlet.
With the pickup submerged, switch the pump on. Open one fixture at a time, operating hot and cold separately until undiluted antifreeze reaches each side as your product and RV instructions require. Close it and move to the next outlet. Watch the jug so the pickup does not suck air.
Include kitchen and bathroom taps, the shower hose and head, toilet valve, toilet sprayer, outside shower and outdoor kitchen. Run mixer controls as the manual specifies. Switch the pump off when finished.
Make it easierUse an outlet-by-outlet list. Seeing pink at the kitchen sink tells you nothing about a closed branch elsewhere.
Catch the branches that faucets don’t cover.
A city-water inlet, black-tank flush line, washer, dishwasher, ice maker or drinking-water system may need its own procedure. These do not necessarily receive antifreeze just because your taps do. Open the relevant appliance manual and finish each fitted item separately.
Do not force a city-inlet check valve while the system is pressurized. If the manual calls for compressed air, use clean, regulated air and the specified pressure limit. This guide does not prescribe an air-only method or a universal pressure setting.
Make it easierMake a ‘not fitted’ mark for appliances you don’t have. That keeps a deliberate skip from looking like a forgotten step.
Protect the drains and toilet seals.
Add the specified amount of RV antifreeze to each sink and shower drain to protect the water held in its trap. Treat the toilet bowl and seals only as the toilet manufacturer directs. A pink stream from a tap is not a substitute for checking these final instructions.
Leave the plumbing, drain caps and winterizing connection in their specified storage positions. Do not add fresh water after winterizing; it can dilute or displace the protection.
Make it easierRecord the date, product used, quantity and final valve settings. Keep the note with your manuals for spring.
Put the rest of the camper to bed.
Remove food and freeze-sensitive liquids. Clean and dry the fridge, and use its storage latch as directed. Inspect the roof and exterior seals from a safe position; arrange repairs for leaks before storage. Remove attractants and close pest entry points without blocking required ventilation.
Use the battery manufacturer’s storage and charging instructions for your battery chemistry. Finish the RV’s tire, propane and storage checklist. Before using the water system again, follow the full flushing and sanitizing procedure in your manual.
Make it easierMake a short spring shopping list now: a tired seal, missing cap or worn fitting is easier to remember while you’re looking at it.
QUICK ANSWERS
Three things worth double-checking
Is pink at every faucet enough?
It confirms flow through those outlets. Separate inlets, appliance branches, filters, traps and the heater still need their own checks. Follow the required product concentration and each manual’s finish-up procedure.
Can I just blow the lines out?
Only if your equipment manuals permit that method and you can follow their complete procedure and pressure limits. Some systems require antifreeze. Air alone does not replace the specified protection for traps and other water-holding parts. See Winnebago’s explanation of the two methods.
Can I use the water after winterizing?
Water use can undo the protection. Follow your RV’s full de-winterizing procedure before use, and winterize again before freezing storage if you refill the system. Keep the empty heater off.
THE FINAL WALK-THROUGH
Your winterizing checklist
Use this alongside the steps and your manuals. Checkmarks last while this page stays open.
A LITTLE LOCAL HELP
Find the right bits before you start.
Need a winterizing connection, replacement drain plug or the right fitting? Send a photo and the appliance model number, or call Billy to ask about availability.
Ask about winterizing suppliesManufacturer references
Prepared from the resources below in September 2026. These general guides cover different RVs; your camper and appliance manuals take priority for your equipment.
- Winnebago: winterizing guide & special considerations ↗
- Jayco: RV winterizing tips ↗
- Winnebago: winterizing & storage ↗
- Truma AquaGo: winterizing and depressurizing FAQs ↗
- Suburban: water-heater FAQs ↗
- Camco: antifreeze dilution & burst protection (PDF) ↗
- Jayco: winterizing the plumbing system ↗
- Winnebago: supplies for winterization ↗
PASS THE KNOW-HOW ALONG
One guide. Ready to share.
Save a reminder for yourself, share the graphic, or use the short video with your own voice and music.
Portrait image · 1080 × 1350
60 seconds · 1080 × 1920 · silent, with on-screen text
Caption, carousel & video editing kit
The kit includes eight carousel images, a vertical video, narration script, timed captions, and an editable scene outline. Import the MP4 into your video editor to add a voiceover or licensed music. The short video is a reminder; keep the full guide available with your post.
This review site is private. Public article links and social link previews will work after public publication. For now, download the media and prepare your post; add the public article link when it is available.